
The checklist lives inside the More tab
Open the More tab and tap Checklist under the trip section. The prep tile near the top of the Home screen leads to the same place, which is one tap less if you open it often.
You need a trip first. Lists are created per trip, so with no trip selected the screen shows a single line asking you to create a trip first. Create a new trip or select an existing one and come back.
With more than one trip, the list on screen belongs to the trip currently selected. If it looks empty or full of items you do not recognise, tap the current trip card at the top of the More tab, pick the right trip from the list and come back.
If you created the trip yourself, the list starts empty. The screen tells you the checklist is empty and suggests adding a category with the + button, and the progress reads 0%. When you build a trip by uploading booking documents or an itinerary for the AI to read, any checklist contained in that result is saved along with the trip, items included. There is no template picker, and creating a trip does not fill items in on its own.
Step by step: creating categories and items
Items only exist inside categories, so the category comes first.
- Tap the + button at the bottom right to bring up the add sheet
- Choose Add Category, type a name and tap add
- Tap + again and choose Add Item
- Select the category at the top, type the item name below it and tap add
If you tap Add Item while no category exists yet, the Add Category screen opens instead. That is not a misfire, it is the app putting the steps back in order.
On the add item screen, the first category is preselected. If you have several, check that the highlighted chip is the right one before tapping add. There is no way to move an item to a different category afterwards.
Tapping an item checks it. The whole row is the button, so you do not have to hit the small checkbox, and a checked item fades and gets a strikethrough. Tap it once more to undo.
Names work better written as actions. An item that names an object leaves you wondering whether buying it counts or only packing it does, and that hesitation is what makes people skip the check. Save the accommodation address, pack a charger, save the booking confirmation: each of these makes it obvious what finishing looks like.
Some people name categories after moments instead, such as a week before, the night before, or departure day. That is only a name. The app does not calculate those dates or send a reminder at that time. It simply puts the list in an order you can read.
How the progress number moves
The percentage at the top is the share of checked items among every item registered on that trip. It is calculated once for the whole trip regardless of category, and the decimal is rounded.
| Items registered | Items checked | Progress on screen |
|---|---|---|
| 0 | 0 | 0% |
| 10 | 7 | 70% |
| 11 | 7 | 64% |
| 200 | 199 | 100% |
Two rows are worth pausing on. The third one: at 70%, remembering one more task and adding it drops the number to 64% even though you checked nothing off. While a list is still growing, going backwards is normal. The last one: on a very long list, one unchecked item can still round up to 100%.
A displayed 100% does not guarantee that every item is checked. Rounding can hide an unchecked item, so scan the list for remaining open rows. Tasks and supplies you never listed are outside the calculation altogether: this number does not certify that your preparation is complete.
Opening the same list in a browser
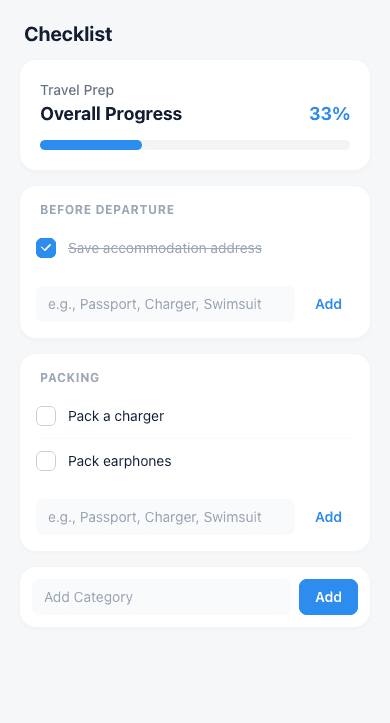
The screen above is the checklist opened in a browser. One of three items is checked, which is why it reads 33%.
Two things are required on the web: being signed in, and having access to that trip. Without either one the page does not open even if you have the address. Someone who joined as a viewer sees no input fields or add buttons at all and can only read the list.
The buttons also sit somewhere else. There is no + button on the web; you type into the input fields directly.
| What you do | App | Web |
|---|---|---|
| Where to open it | Checklist in the More tab | Sign in, then Checklist inside the trip |
| Add a category | + button, Add Category | Type the name in the input at the bottom of the list |
| Add an item | + button, Add Item, pick a category | Type it in the input inside the category card |
| Check an item | Tap the item row | Tap the item row |
Offline and other devices
The app stores the checklist on your device, so you can open it and check items offline. While you are signed out, changes stay on that device. The web reads the list from the server and is not designed for offline use.
To see changes on another device, follow this order:
- Sign in on the app where you made the changes and check your connection. Offline changes reach the server only after connectivity returns and a sync succeeds. Reconnecting alone does not trigger an immediate upload.
- Sync automatically or manually. With Auto Sync enabled in More, the app attempts a sync when it returns to the foreground or you change an item. With Auto Sync off, you can still use Sync Trips in More or pull down to refresh the checklist. Both manual actions require sign-in and sync in both directions, sending local changes and receiving server changes.
- Refresh the receiving device. In the app, pull down on the checklist or use Sync Trips. On the web, refresh that trip's page. Companions' changes do not arrive in real time, and merely reopening the checklist screen inside the app does not guarantee a sync.
What the app does not do for you
- There is no button to rename or delete an item, in the app or on the web
- There is no drag to reorder. Items stack in the order they were added
- There are no due dates, reminders or assignees. A deadline can only be implied by the category name
- The checklist screen has no button to import only a past trip’s list
Keeping the list short and writing clear names from the start is the most practical habit on this screen.
Related guides
If deciding what to write is the hard part, borrow items from the overseas travel packing checklist, and to split a list with the people you travel with, see the invite steps in planning a trip together.
The screens and behaviour described here were checked on 2026-09-08 in the app and in the web checklist. The scope is how the checklist screen works and how progress is calculated; what to actually pack is covered in the packing article linked above. Screens may change as the app is updated.
- Download on the App Store
- Get it on Google Play
- No install needed: tripop.app/web